How to start phishing
Welcome to Your Phishing Simulation Guide!
This guide will help you understand how our platform works. Here, we provide step-by-step instructions on creating a phishing email, setting up landing pages, and tracking your simulations. Whether you’re new to phishing or just need a refresher, you’ll find all the details here to make the most of our platform.
Before jumping in
Before diving into the process of creating a phishing simulation, it’s essential to take a step back and define the type of simulation you want to create. A well-thought-out simulation is far more effective in gaining exp and bounties.
Our submission creator allows you to create mails that focus on specific interaction types, such as link clicks, or attachment downloads, and it enables you to pinpoint your target audience with precision—whether by job function, industry, and more. You can also decide on the format of your simulation, choosing between simple text-based emails or more visually engaging HTML/CSS designs replicating official .
Considering these factors early sets you up in creating a strong phishing simulation. More info about the whole process below.
Some additional tips
- Check out local news channels to find interesting topics that might inspire your phishing ideas.
- There are many sites around that publish the latest phishing mails. These can help you as inspiration for new templates,
e.g.: Safeonweb.
- Many large companies have press kits available with corporate identity material that can be used in marketing context. This can easily be used in ethical phishing.E.g. Itsme offers substantial amount of material.
-
A.I. tools can help you with creating simulations, even incorporating placeholders and with the ability of aiming the mail at a specific business function or department.
- Review emails in your inbox and use them as inspiration. You can copy their layout by using tools such asProofjump
- Join our Discord community for tips, insights and the latest phishing news!
Submission process
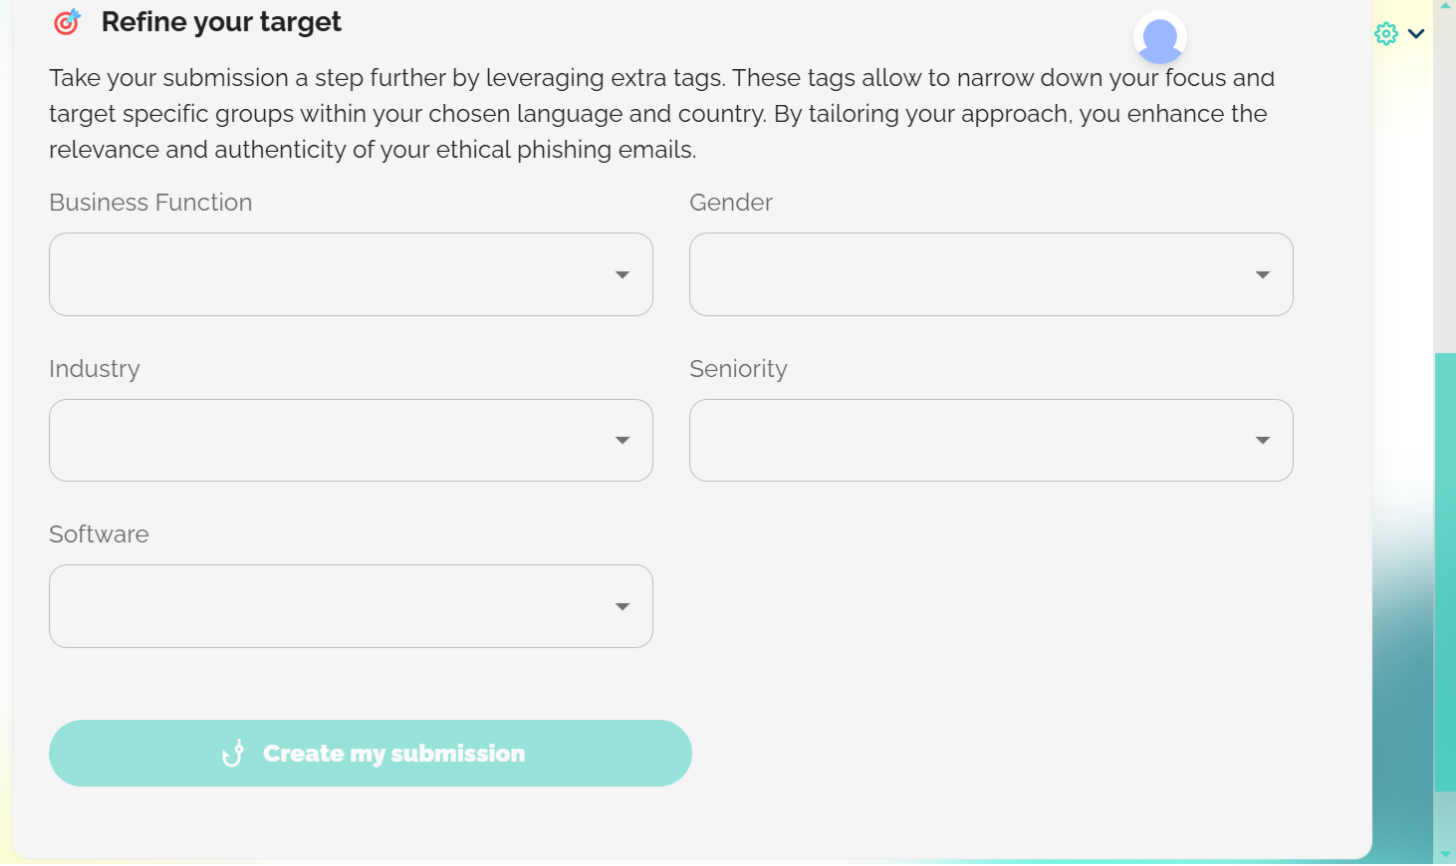
First, choose the country and language for your phishing email. Once those required fields are filled in, you can fine-tune things even more. Options include business function, gender, industry, seniority, or even specific software use.
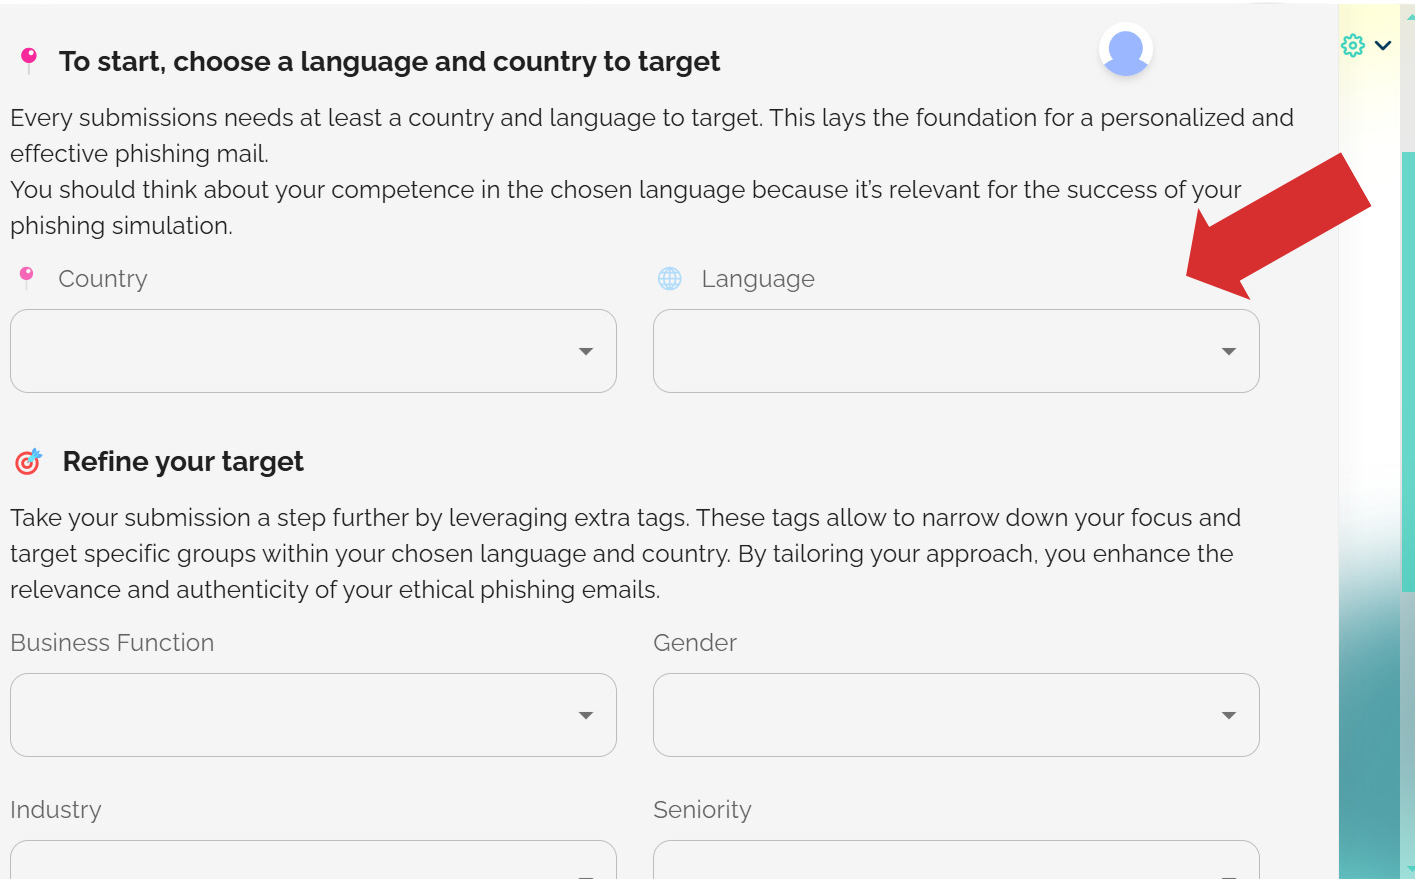
Adding more tags, and specifically business functions and industry, heightens the relevance of your mails to the target group which subsequently improves the potential phishing success.
Moreover, mails with more tags selected will get prioritized by our algorithm over more generic mails .
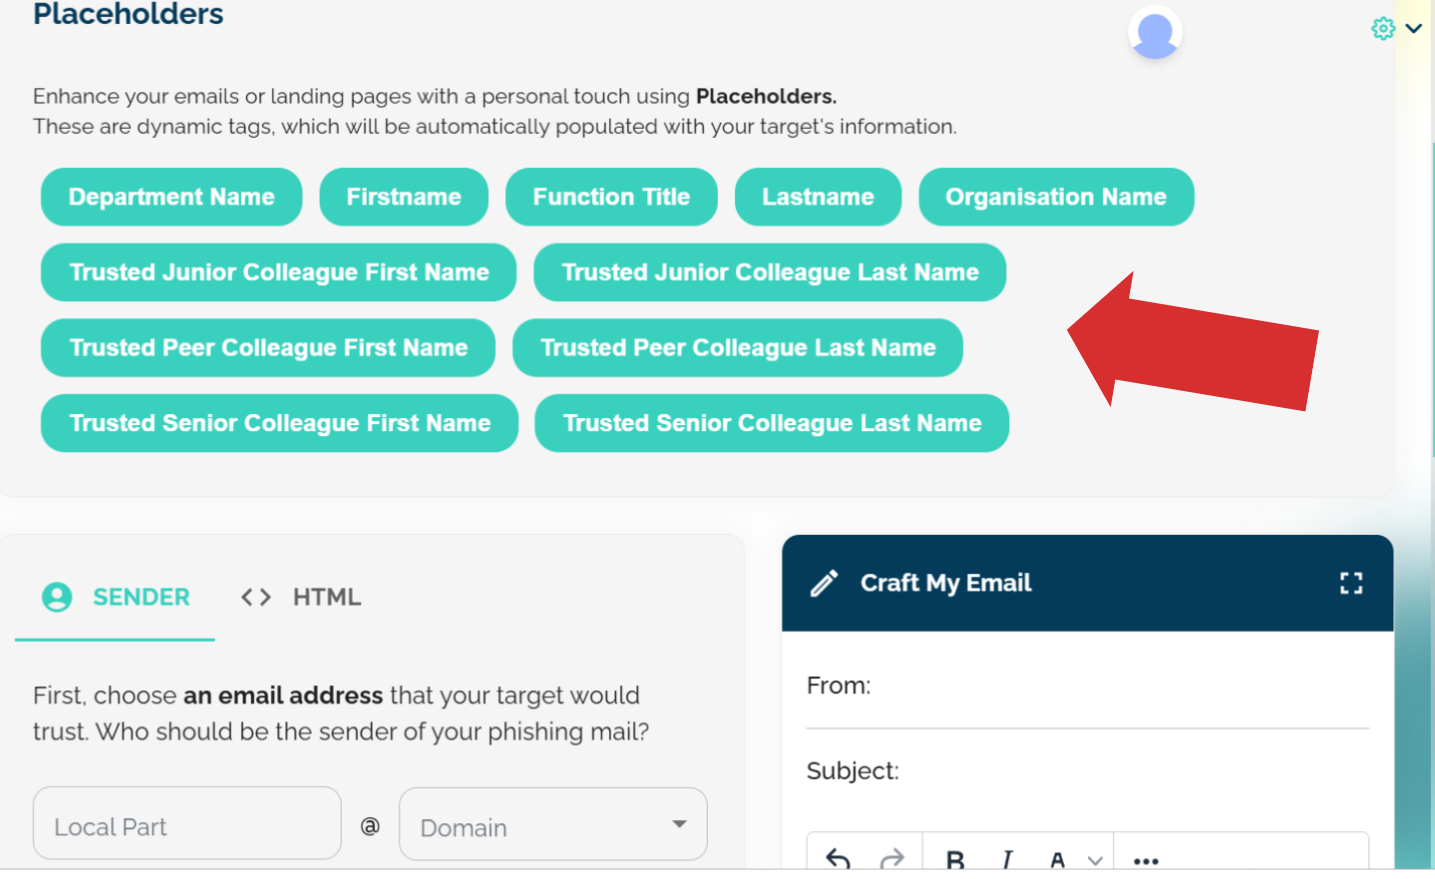
Once you've locked in your tags, you're ready to start creating your phishing email. At the top of the page, you'll find placeholders. These will appear as the recipient's name, last name, organization, or even their colleagues when the email goes out.
This way you can create a more personalised mail.
Senior colleague placeholders are, depending on the size of the company, the manager of the recipient or the CEO of the entire organisation.
Peer colleagues are colleagues that the recipient works with on a daily basis.
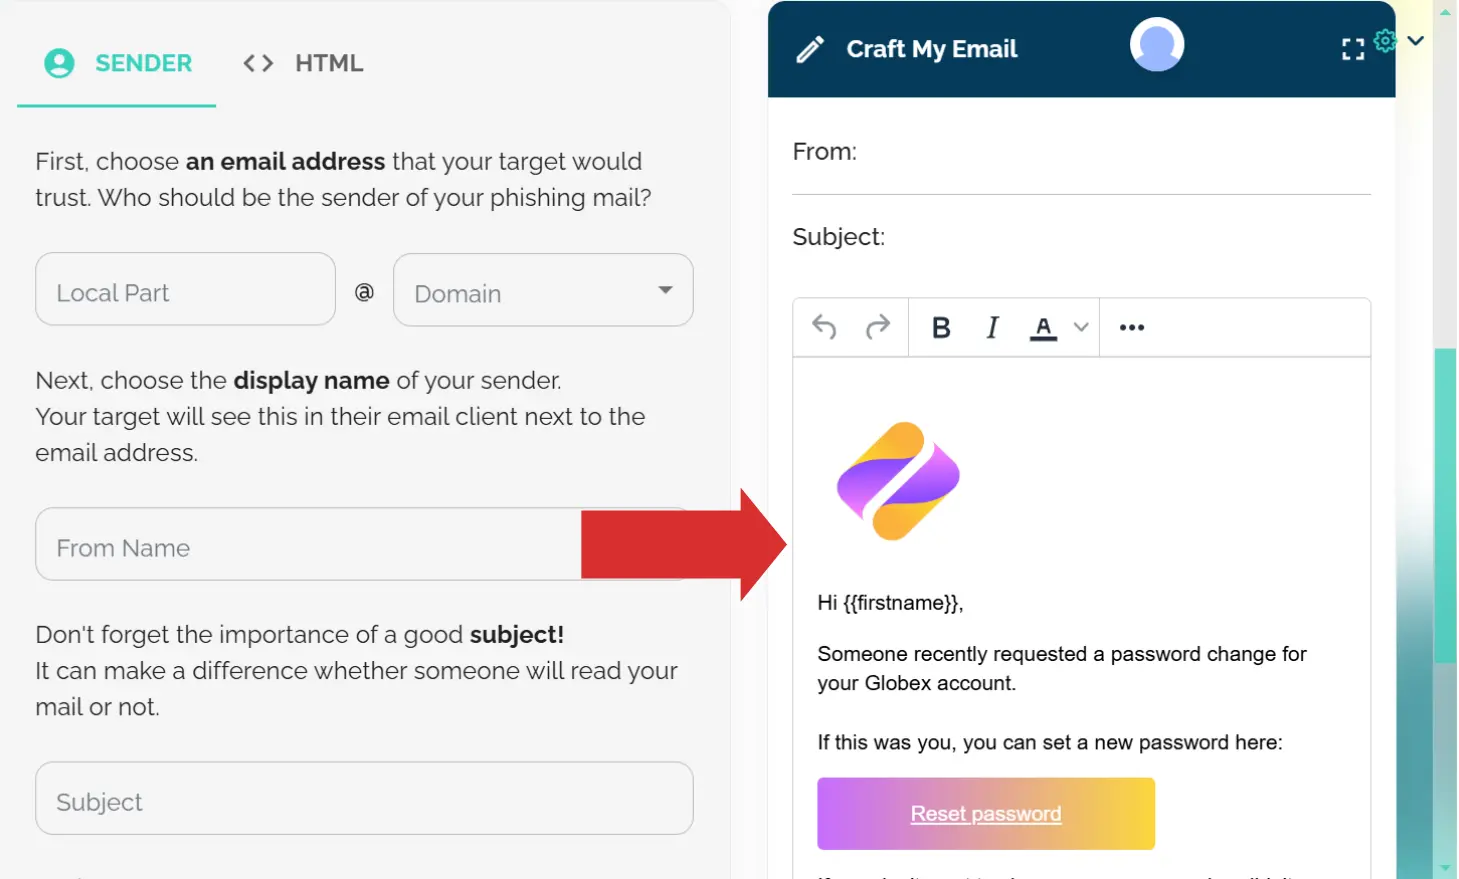
Scrolling down, you’ll find the option to choose the email address. You’ll need to fill out a local part, which you can customize, and select a domain name from a provided list.
Next, you can set the sender's display name, which your target will see in their email client alongside the email address.
This is optional but typically increases phishing success.
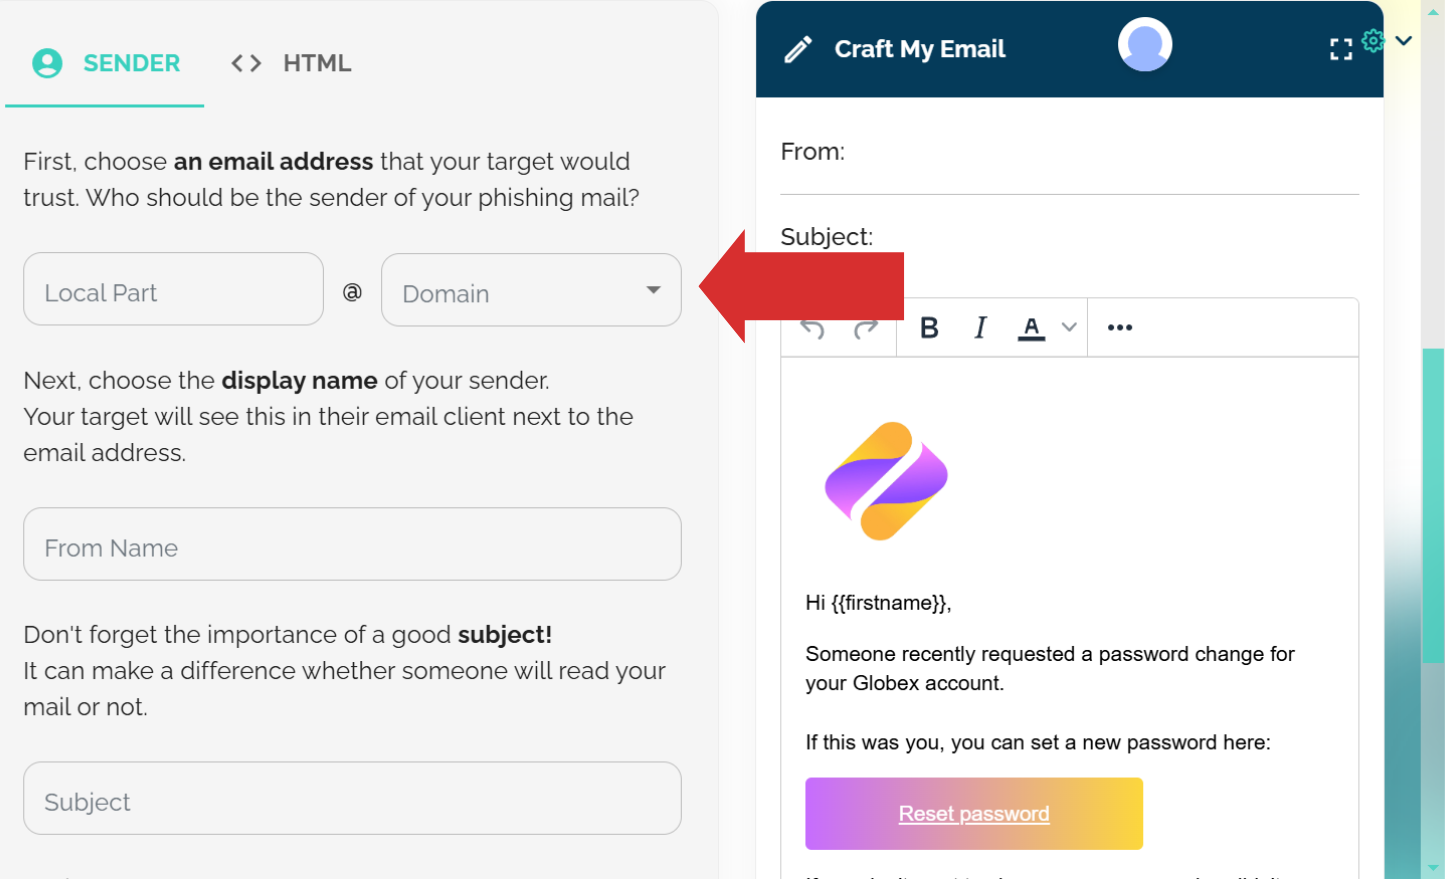
After that, the most critical part is crafting a good subject line. This will determine whether your email gets opened.
Here it is best to stay concise while also triggering curiosity.
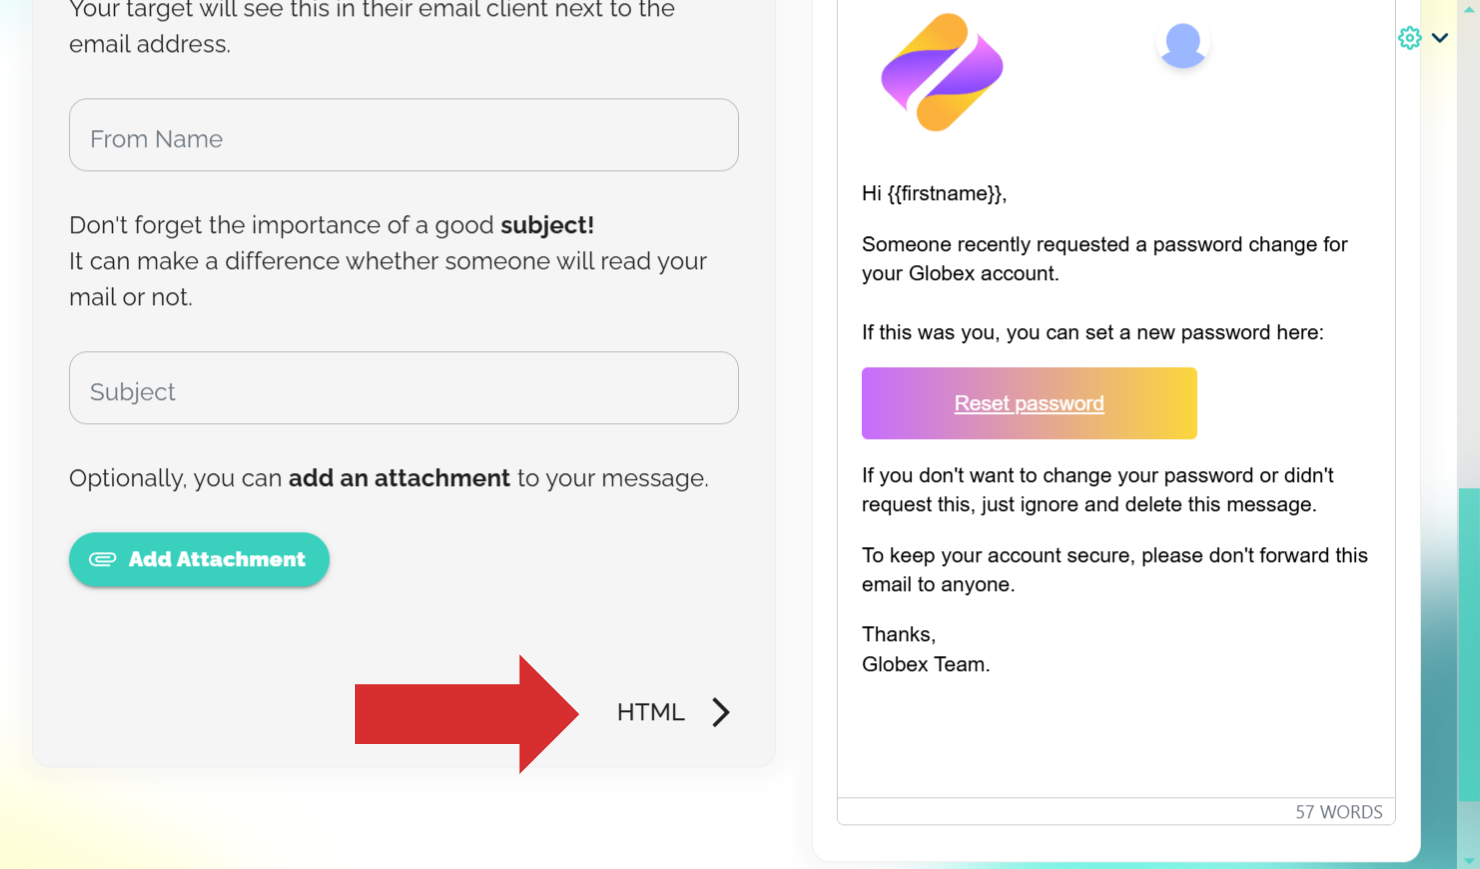
A last option on this page is to add attachments to the email. This will only require specifying the attachment name; you don’t need to upload a file.
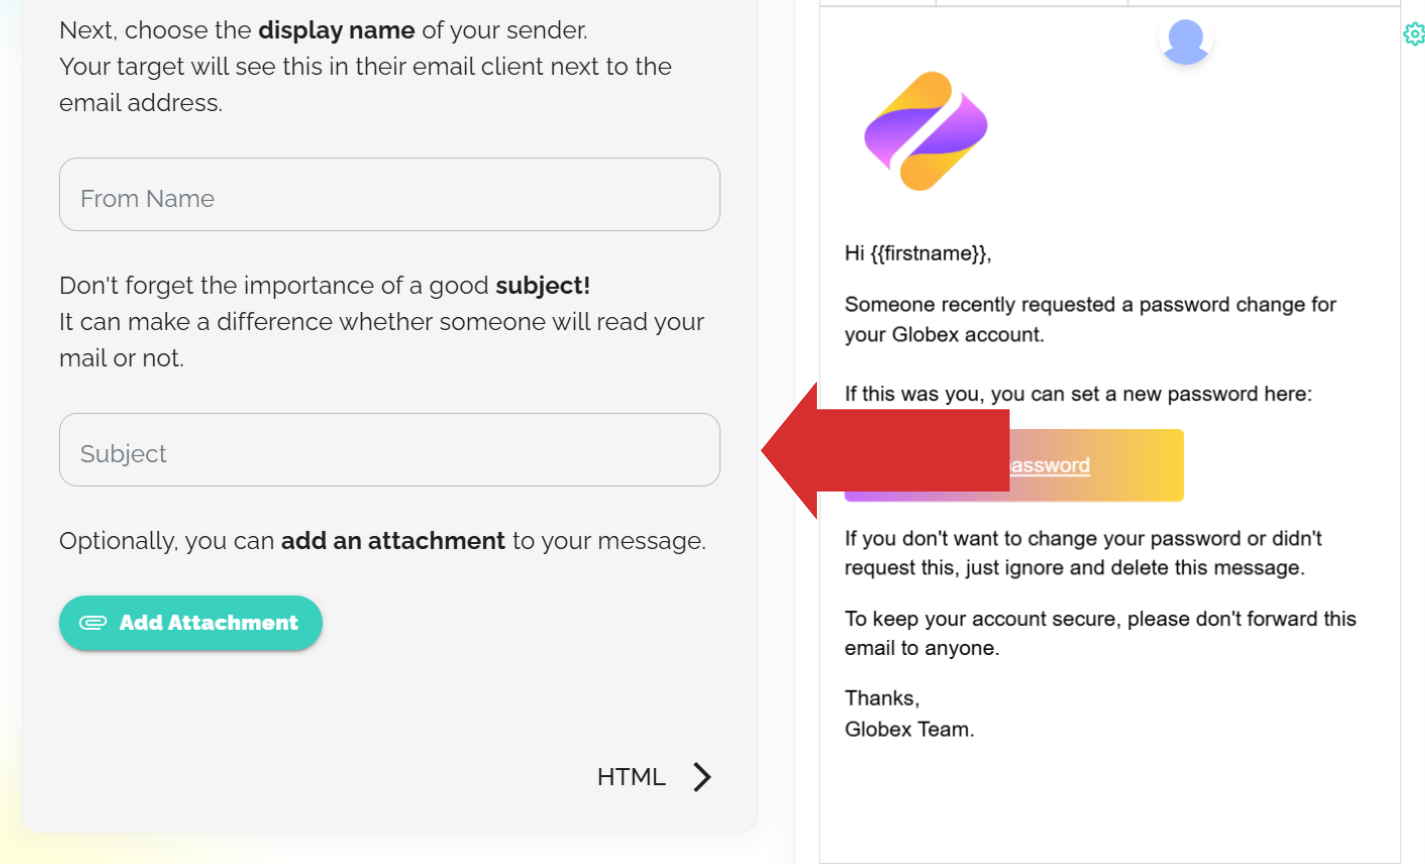
Continuing on, it's time for creating your phishing email, here you’ve got two options: go the coding route with HTML/CSS or use the built-in text editor.
Depending on the subject and the sender you choose for your simulation, you should make your choice in what layout you want for your mail.
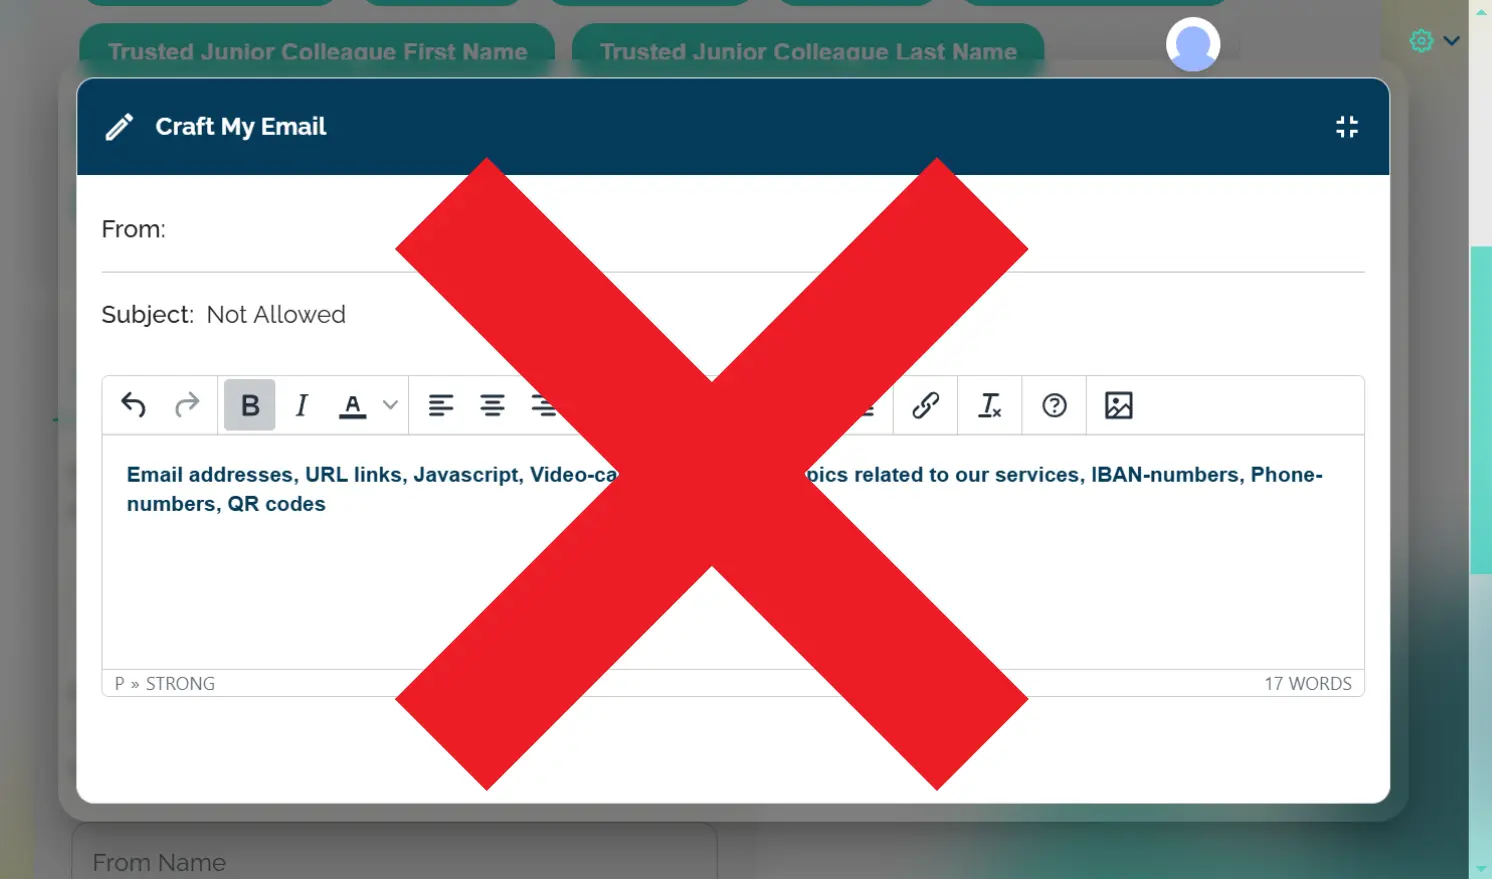
To keep things safe for our clients, the creator comes with built-in safety checks. These automatically strip out any elements that could potentially harm the recipient, ensuring a secure phishing campaign.
These elements are NOT allowed:
- Email addresses (use placeholders: {{firstname}}.{{lastname}}@{{organisation name}}.com)
- URL links (use link button or <a href=" ">)
- Javascript (or any other code than html/css)
- Video-call meeting links
- Topics related to our services (phishingtrainings, warnings, ...)
- IBAN-numbers
- Phone-numbers
- QR codes
Going for a html/css layout is a good way to mimic official communications from big corporations, online software, …
To make a html based email, click “html” field next to “Sender”.
Creating mails using the html editor can be slow sometimes, have some patience or use an external code editor such asVisual Studio Code.
Creating a simple text-based mail can be a great way to mimic HR announcements, communication between close colleagues and more.
To make a text-based email, edit the field in the “craft my email” container.
Join our Discord community!
Join our Discord server and share insights, ethical phishing tips, or just to hang out
with our community of ethical phishers!
Once you're happy with your phishing email, the next step is linking a landing page to your template.
You’ve got two options: design your own landing page to encourage data submissions (hello, more bounties!) or stick with the default tips page we provide.
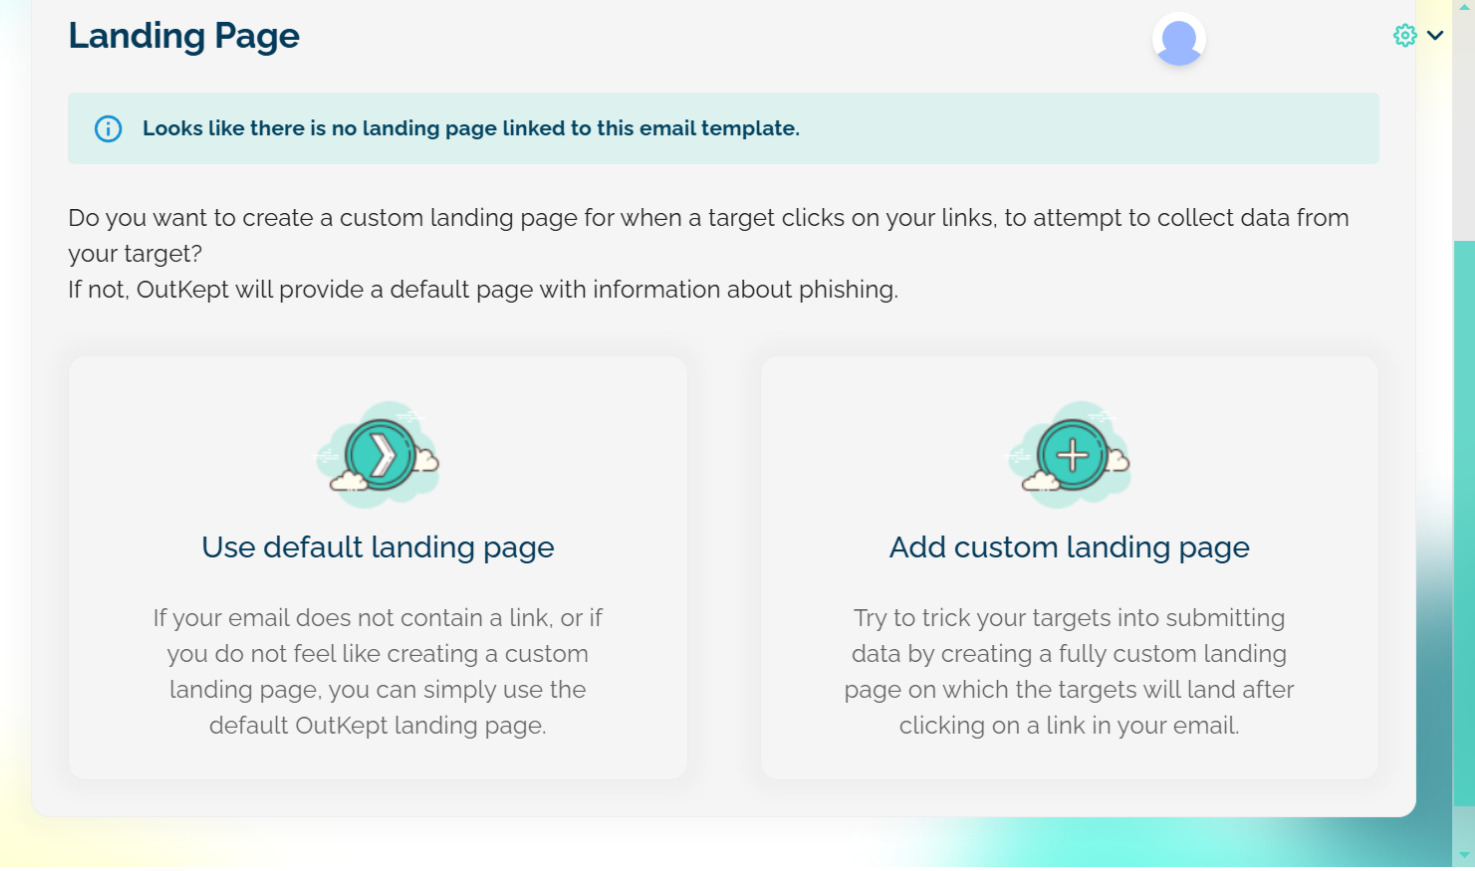
If you’re creating your own, keep in mind that building landing pages takes some coding skills. That said, with the help of your go-to AI tool, even non-coders can whip up a decent one these days.
The key to an effective landing page is including a form that asks for sensitive information—think passwords, personal IDs, or similar data.
Templates with landingpages which do not ask for sensitive information will be declined.
When you’re done with the landing page, you are able to submit the email. The simulation will be marked as “Reviewing” and awaits an additional check. If we don’t find any issues, the email will get approved and sent out shortly.
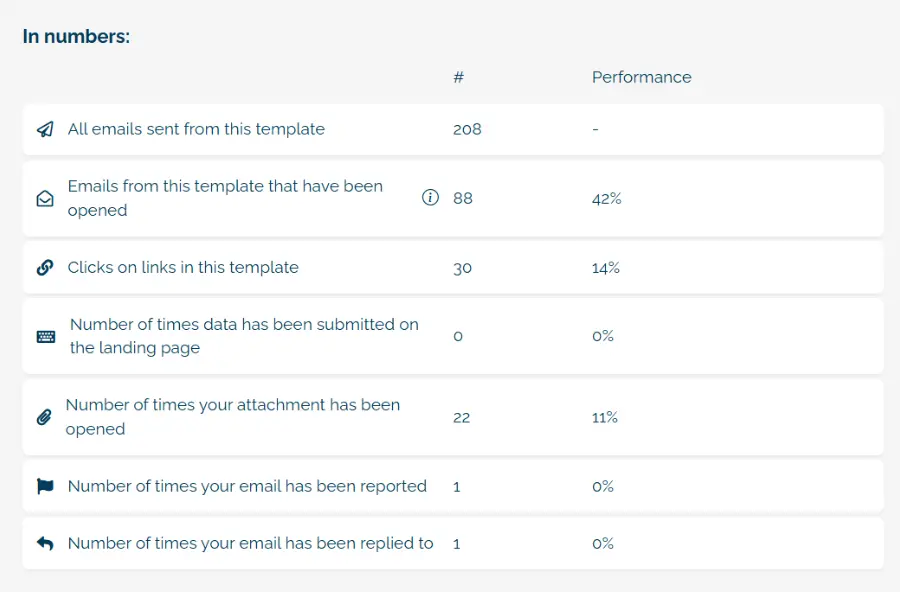
After your mail is launched, you’re all set to track its performance. You can monitor overall statistics—such as interactions (clicks, opened attachments, data submissions, etc.)—and analyze these metrics for specific emails individually.
To view your general statistics, head over to the My Statistics page.
Here, you’ll find detailed graphs to evaluate your performance, track key numbers below, and even filter results based on specific tags.
This data can provide valuable insights into your targets, highlighting who to focus on and which interactions they are most susceptible to.
More information about the possible interactions and their value can be found on the Reward information page.

To track the success of a specific simulation, navigate to the Submissions page and select the template you want to analyze. This allows you to dive deeper into the performance of that email, reviewing how it performed across various interaction types
Factors such as the quality of your email template, timing, and relevance to your target audience can significantly impact the success.
As a benchmark we can say that an average success rate of around 10% is a good performing phishing mail.